Call me crazy, but I like the stability of being able to get more than one toe on the ground at a time. Am I capable of riding a bike that is nearly impossible for me to touch the ground--of course I am. You should see me on the KLX--if it is standing straight up, my toes wave around in the air. It's a light bike and I can pretty easily drop a toe on one side or the other to hold it up, but the new GS is not light. I also expect, at some point, to have to put my foot down in an off-camber situation, and would prefer to have a better chance of dropping that foot and not the bike. I could have bought a lowered chassis version of this bike, but I didn't want to lose any clearance. I have bashed the bottom of Thumper on rocky steps--yay! Bash Plate!--and I didn't want to lose any clearance on this new one if I didn't have to. I also didn't want the optional low seat. I wanted a custom seat. Well hey, I've got those skills and all the correct tools. So one snowy weekend, when I wasn't riding anyway...

First step is simple. After removing the seat from the bike, pull off the cover by carefully removing staples. This seat is remarkably simple compared to my little Honda seat I did a few years ago.
 |
| I sit...here! |
With the cover off, I put the seat back on the bike, sat on it, and using a Sharpie (carefully--I didn't want Sharpie marks on the crotch of my jeans) I roughly marked in the area of the seat where I comfortably sit.
 |
| Mapping out areas to be removed. On the top of that list is the ridge on each side of the seat. |
Poking at the foam, I determined the levels of foam I would be able to shave away, outlining and writing those numbers in so as to remind myself as I worked.
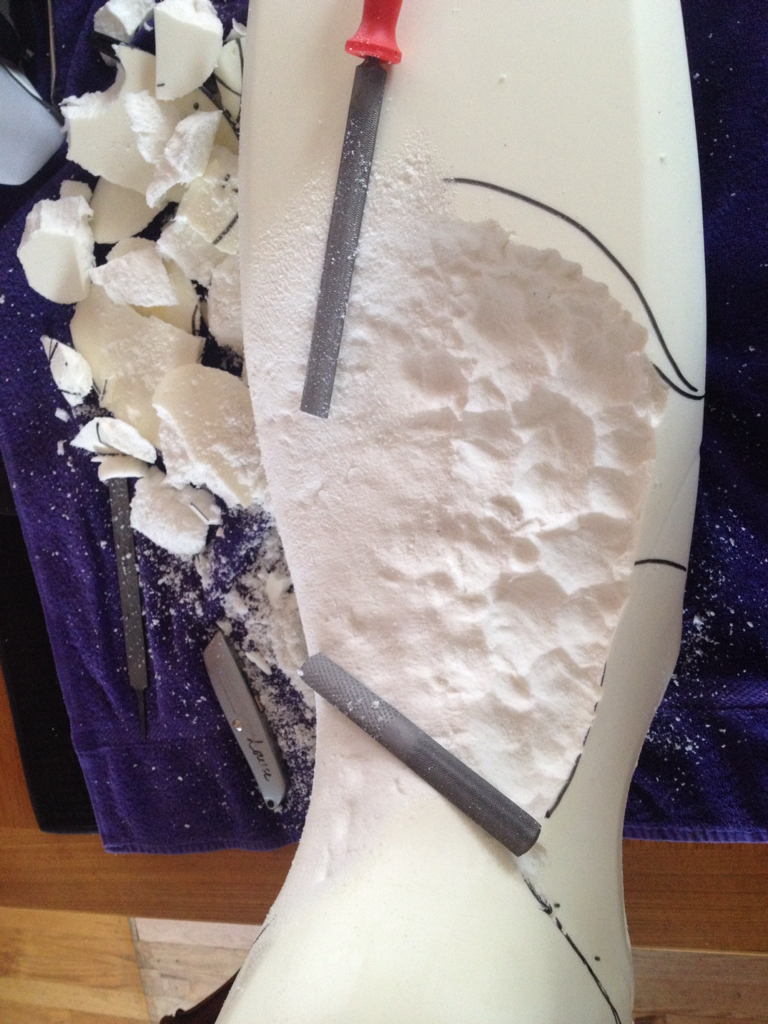 |
| Oh my dog--the foam really got ALL OVER! I ran the shop vac along side my project for as long as I could stand the noise. |
I began carefully cutting the foam away to approximate depths, and once it was roughed in, I began smoothing it out. I used three different sized files, smoothing down with the finest at the end.
 |
| Getting there.... I love how smooth it is now--no ridges on the sides. |
When the seat was sufficiently smooth, I loosely fit the cover back on and tried it out on the bike. Success! I could get the flat part of my toes on the ground on both sides--not quite the balls of my feet, but that's okay. I reattached the cover with a manual staple gun, stretching it more for a snug fit, and put the seat back on. At some point, after I determine this is the final shape I want (probably after a long trip), I will use a pneumatic stapler to finish the seat cover. There are a few areas that are too skinny to get staples from a manual stapler into. For now, it works fine.
 |
| There are some skinny areas this stapler doesn't get into well. I'm planning on finishing it after I test it on a long ride. After I do, I'll use a pneumatic stapler with the air compressor to re-assemble. It has a narrower area where the staples come out, and can get into tight little crevices. |
This is a really simple thing to do on one's own. I would say the most difficult part is having the right tools for the job. One hint, some types of foam carve away easily with a serrated electrical knife. You know, the kind Mom used on the ham at Christmas. However, not all seat foam is the same, and some will just get torn all to hell. If you're going to attempt this, go slowly at first to know what you're working with, then create a custom spot for your custom butt!
Motorbike Wonderful motorcycle with great economy I am very happy to find matters that speak about these wonders of four wheels I am in process with my habilitation and I think it all a marvel
ReplyDelete